
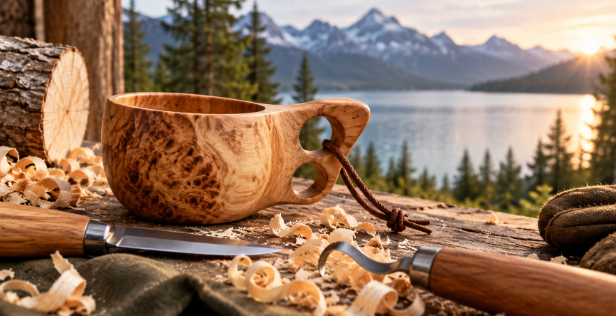
Kuksa carving is a traditional wood-carving practice associated with the creation of a small wooden drinking cup or vessel. Kuksa-style cups are typically shaped from a single piece of wood and are valued for their practical design, natural appearance, and connection to Nordic and Sámi craft traditions.
Making one requires more than simply removing material from a block. The Kuksa carving must select suitable wood, establish the cup’s overall shape, hollow the interior, refine the handle, smooth the surfaces, and finish the piece appropriately for its intended use.
What Is a Kuksa?
A kuksa is a traditional wooden cup or drinking vessel, particularly associated with northern Scandinavian craft traditions.
Traditional examples are often carved from birch burl, although other woods can be used for contemporary versions. Birch burl has an unusual grain structure that can provide strength and distinctive visual characteristics.
A typical kuksa has a rounded or slightly oval bowl, a relatively thick wall, and an integrated handle. The design is compact and functional, making it suitable for outdoor use.
The construction from a single piece of wood is one of its defining characteristics.
What Wood Is Best for Kuksa Carving?
Wood selection has a major influence on the carving process and the finished cup.
Birch is traditionally associated with kuksa making, especially birch burl. Burl wood develops when abnormal growth occurs on a tree, creating an irregular grain pattern.
This grain can make the finished piece visually distinctive, but it can also make cutting less predictable.
Other carving woods may be suitable for beginners, depending on availability and intended use. Basswood, for example, is widely regarded as a relatively easy wood for carving because of its consistent and comparatively soft structure.
The important considerations include grain, moisture content, hardness, defects, and whether the wood is appropriate for a functional food-contact object.
Should You Use Green or Dry Wood?
Both green and dry wood can be used, but they behave differently.
Freshly cut wood contains considerably more moisture and is generally easier to remove with hand tools. However, it will shrink as it dries.
Uneven drying can lead to cracking or distortion.
Dry wood is more dimensionally stable but may require greater effort during carving.
For a functional kuksa, understanding moisture movement is important because the cup’s wall thickness and overall shape influence how it responds while drying.
What Tools Are Needed?
A basic kuksa project can be completed with a relatively small selection of quality carving tools.
Common tools include:
- Carving knife
- Hook knife
- Gouges
- Mallet
- Saw
- Carving axe
- Rasps
- Abrasives
- Clamps or carving vise
A hook knife is particularly useful for removing material from the inside of the cup.
A carving axe or saw can be used to establish the rough exterior shape before finer carving begins.
Tool selection depends on the size of the blank and the desired carving method.
How Do You Prepare the Wood Blank?
The blank should be inspected before carving.
Remove or avoid sections containing serious cracks, unstable inclusions, rot, or other defects that could compromise the finished vessel.
The grain direction should also be considered.
For a kuksa made from a burl, the irregular grain can run in multiple directions, making it difficult to predict exactly how a blade will behave.
Secure the blank firmly before using cutting tools. A stable workpiece allows greater control and reduces the likelihood of accidental movement.
How Do You Establish the Shape?
The exterior shape should generally be established before the interior is fully hollowed.
Begin by marking the approximate outline of the cup and handle. A saw or carving axe can remove large amounts of excess material efficiently.
The goal at this stage is not to achieve a finished surface but to create a manageable form.
Leave enough material around the walls and handle to allow for refinement later.
The shape can then be gradually refined with carving knives, gouges, and rasps.
How Is the Interior Hollowed?
Hollowing is one of the most important stages of Kuksa carving.
A hook knife or suitable gouge can be used to remove material from the interior.
Work gradually rather than attempting to make deep cuts immediately.
The cutting direction should account for grain orientation. Cutting against an unfavourable grain direction can cause tear-out or sudden blade movement.
Rotate the work frequently and inspect the interior regularly.
Maintaining a reasonably consistent wall thickness helps the finished cup look balanced and can reduce uneven movement as the wood dries.
Why Is Wall Thickness Important?
Wall thickness affects both durability and appearance.
Walls that are excessively thick can make the cup unnecessarily heavy and reduce its internal capacity.
Walls that are too thin may become fragile, particularly around the rim and handle connection.
There is no single universal wall thickness for every kuksa. The dimensions depend on the wood species, cup size, design, and intended use.
The rim should also remain strong enough to withstand normal handling.
How Should the Handle Be Shaped?
The handle is an important functional part of the cup.
A traditional-style kuksa often has a compact handle integrated directly into the body.
When shaping the handle, avoid removing too much material too quickly. The connection between the handle and cup body needs sufficient strength.
Rounded transitions can reduce sharp edges and make the handle more comfortable to hold.
The final handle shape can be refined with carving knives and rasps after the bulk of the material has been removed.
What Is the Difference Between Kuksa Carving and Bowl Carving?
Both Kuksa carving and bowl carving involve hollowing wood, but their forms and construction differ.
A bowl generally has a wide opening that provides relatively easy access to the interior. A kuksa has a smaller opening combined with a handle and deeper, more compact proportions.
The restricted interior of a kuksa makes tool access more challenging.
Bowl carving can therefore be useful for learning basic gouge control and grain awareness before attempting a more compact vessel.
However, a kuksa also introduces additional considerations because the handle must be integrated into the overall structure.
How Do You Avoid Tear-Out?
Tear-out occurs when wood fibres break away below the intended cutting surface rather than being cleanly sliced.
Grain direction is one of the main causes.
When possible, make cuts that support the fibres rather than levering them away from the surface.
Sharp tools are essential. A dull knife requires more force and is more likely to produce uncontrolled cuts.
Small, controlled cuts are generally preferable to forcing a blade through difficult grain.
Burl wood can be particularly unpredictable because its grain may change direction frequently.
Should the Surface Be Sanded?
Sanding can refine areas that are difficult to achieve with carving tools alone, but it should not necessarily be used to compensate for poor cutting technique.
A well-sharpened carving tool can leave a surprisingly smooth surface.
If sanding is required, begin with an appropriate abrasive and progress gradually toward finer grades.
The interior may require additional attention because curved surfaces can be difficult to sand evenly.
Avoid excessive sanding around the rim or handle because removing too much material can change the proportions of the design.
How Should a Kuksa Be Dried?
Drying requires patience.
Freshly carved wood loses moisture gradually, and uneven moisture loss can cause cracks.
A controlled drying environment can reduce the risk of severe checking.
The specific approach depends on the wood species, moisture content, wall thickness, and climate.
A thick blank should not necessarily be treated the same way as a thinly carved vessel.
Some traditional carving practices allow green wood to dry slowly after rough shaping, with further refinement performed after the wood has stabilized.
How Should a Wooden Cup Be Finished?
The finish should be appropriate for a functional drinking vessel.
Food-contact considerations are important because the interior will come into contact with liquids.
Some wooden-cup makers leave the surface naturally finished after careful carving, while others use suitable food-contact oils.
Any finish should be selected and applied according to its manufacturer’s instructions and suitability for food-contact applications.
The wood should be allowed to cure fully before the vessel is used.
How Should a Kuksa Be Maintained?
Wooden cups require different care from ceramic or glass vessels.
Avoid treating a carved wooden cup like a dishwasher-safe manufactured container unless the specific finish and wood have been designed for that use.
Hand washing with mild soap and appropriate drying practices can help preserve the wood.
Prolonged soaking should generally be avoided because repeated moisture exposure and drying can contribute to dimensional movement.
Allow the cup to dry thoroughly between uses.
What Mistakes Should Beginners Avoid?
Several mistakes are common when learning Kuksa carving.
These include:
- Starting with unstable wood
- Using dull tools
- Removing too much material too quickly
- Ignoring grain direction
- Making the handle too thin
- Creating uneven wall thickness
- Drying the wood too rapidly
- Over-sanding the surface
- Failing to secure the workpiece
Patience is particularly important.
A carving can always be refined by removing additional material, but material that has already been removed cannot easily be restored.
Is Kuksa Carving Suitable for Beginners?
It can be, provided the project is approached gradually.
Beginners should first become comfortable with safe knife handling, basic cuts, sharpening, and grain direction.
Starting with a relatively simple cup shape can make the learning process easier.
A beginner may also benefit from practicing hollowing on scrap wood before attempting a valuable burl or carefully selected blank.
As confidence improves, more complex handles, irregular forms, and decorative details can be introduced.
How Can You Develop Better Carving Skills?
Consistent practice is more valuable than attempting an overly ambitious project immediately.
Practice basic cuts on different wood species and observe how the grain responds.
Learn to sharpen tools properly and develop a habit of checking the cutting edge regularly.
It is also useful to study the relationship between the tool bevel, cutting angle, and grain direction.
Over time, these observations become intuitive and allow the carver to make cleaner and more predictable cuts.
Conclusion
Kuksa carving combines functional woodworking with traditional handcraft techniques. The process involves selecting suitable wood, establishing an exterior profile, hollowing the interior, shaping a strong handle, refining the surfaces, and allowing the wood to stabilize appropriately. Experience with bowl carving can provide useful practice in hollowing, gouge control, and understanding how grain affects cutting, although the narrower opening and integrated handle make a kuksa a distinct project.